Author name: webgeekpro

Chocolate dipped heart cookies
Baking Challenges

Join My Monthly Baking Challenge!

Join My Monthly Baking Challenge! Are you ready to roll up your sleeves, get creative, and have some fun in the kitchen? Each month, I’ll be hosting a themed baking challenge where we all bake along together! From seasonal favorites to creative twists on classics, this is your chance to try something new, sharpen your skills, and connect with fellow baking enthusiasts. Here’s how it works: I’ll announce the theme and recipe idea at the start of the month. You bake it at home – feel free to add your own creative spin! Share your bakes on your Instagram handle and tag me @meltingmoments.bh so I can see your beautiful creations. Don’t forget to use the hashtag #bakingwithmubina. Each month, I’ll feature some of your bakes on my story to highlight your creativity! Whether you’re a beginner or a seasoned baker, this challenge is all about having fun, learning together, and of course, enjoying something delicious at the end. Ready to bake along? Stay tuned for this month’s theme! Love baking as much as I do? Subscribe to my monthly newsletter for exclusive recipes, handy baking tips, behind-the-scenes peeks, and updates on upcoming workshops. Delivered to your inbox once a month! Subscribe Here  

Behind the Scenes

A Day in My Home Baking Kitchen

A Day in My Home Baking Kitchen Ever wondered what really goes on behind the scenes in a home baking kitchen? Let me take you through a typical day in my world of whisking, frosting, and cake decorating—where creativity meets the comforting scent of freshly baked cakes. My mornings always start early, with a steaming cup of butterfly pea flower tea and my notebook. This is my planning moment – mapping out the cakes I’ll bake, jotting down flavor ideas, and sketching decorating concepts. To stay organized, I batch my tasks: mixing cake batters first, then baking, cooling, and finally decorating. This workflow keeps things smooth and enjoyable. The heart of my kitchen is my stand mixer – it’s my most reliable companion, whipping up buttercream and cake batters to perfection. Alongside it are my favorite baking tools: offset spatulas for neat frosting, precise measuring cups, a dependable oven thermometer, and silicone spatulas that never waste a drop. One of my golden rules is preparation. Before I start, I weigh all ingredients, line my pans, and preheat the oven. This little ritual of mise en place transforms baking from chaotic to calming, letting me focus on creativity. By the time the cakes are baked, cooled, and frosted, my counters are spotless again – and I’m already planning the next cake decorating project. Pro Tip for Bakers:Always set up a Mise en Place station before you start baking. Having every ingredient and tool ready not only saves time but also prevents mistakes. It makes the whole baking process feel joyful instead of rushed. If you’d like to learn baking and discover insider tips, join one of my hands-on baking workshops and bake along with me.   Love baking as much as I do? Subscribe to my monthly newsletter for exclusive recipes, handy baking tips, behind-the-scenes peeks, and updates on upcoming workshops. Delivered to your inbox once a month!

Ganache
Featured Recipes

Milk Chocolate Ganache

Milk Chocolate Ganache Ingredients: 250 g milk chocolate, finely chopped 100 ml heavy cream (35% fat) 2 tbsp unsalted butter, softened 2–3 tsp light corn syrup, optional Pinch of salt Instructions: Place the finely chopped milk chocolate in a heatproof bowl. In a small saucepan, heat the cream over medium heat until it just begins to simmer (don’t let it boil). Stir the corn syrup into the hot cream until fully dissolved. Pour the hot cream mixture over the chopped chocolate. Let it sit for 10 minutes to allow the chocolate to melt. Using a spatula or whisk, stir slowly from the center outward until the mixture is smooth and glossy. Add the softened butter and pinch of salt, stirring until fully incorporated. Let the ganache cool at room temperature until it reaches the desired consistency for pouring, spreading, or whipping. Note: The corn syrup not only makes the ganache shinier but also helps keep it smooth and prevents it from setting too hard when chilled.  Tip: For extra depth of flavor, add a teaspoon of instant espresso powder to the cream before heating — it won’t make the ganache taste like coffee, but it will amplify the chocolate’s richness. Ganache Variations (with Ratios) Dark Chocolate Ganache Ratio: 2:1 (200 g dark chocolate: 100 ml cream) for truffles, or 1:1 for a pourable glaze. Use 70% dark chocolate. Add 1–2 tsp confectioner’s sugar if you prefer it sweeter. White Chocolate Ganache Ratio: 3:1 (300 g white chocolate: 100 ml cream) for truffles, or 2:1 for a pourable glaze. White chocolate has more cocoa butter, so it needs more chocolate to set properly. Salted Caramel Ganache Ratio: Follow the base milk or dark chocolate ratios above. Stir in 2–3 tbsp salted caramel sauce after mixing, and sprinkle with flaky sea salt. Coffee-Infused Ganache Ratio: Use the standard chocolate-to-cream ratio for your chosen chocolate. Dissolve 1–2 tsp instant espresso powder in the hot cream before pouring over chocolate. Nutty Ganache Ratio: Follow your base ganache ratio, then stir in 2–3 tbsp peanut butter, almond butter, or hazelnut spread after mixing. Spiced Ganache Ratio: Use standard ratios. Add a pinch of cinnamon, cardamom, or chili powder to the cream before heating.Top of Form Love baking as much as I do? Subscribe to my monthly newsletter for exclusive recipes, handy baking tips, behind-the-scenes peeks, and updates on upcoming workshops. Delivered to your inbox once a month!

Seasonal Baking Ideas

Spiced Pumpkin Bread Recipe

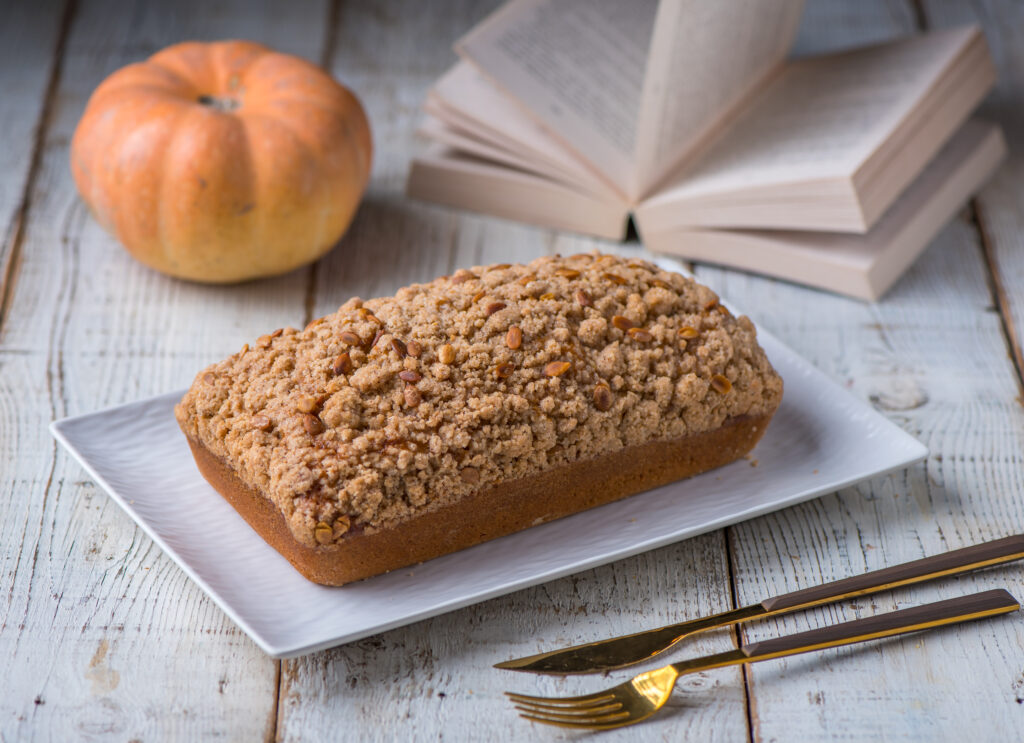
Spiced Pumpkin Bread Recipe Nothing says fall quite like the warm, comforting aroma of pumpkin bread wafting through the kitchen. This Spiced Pumpkin Bread is perfectly moist, rich with pumpkin purée, and infused with cozy spices like cinnamon, nutmeg, and cloves. It’s the kind of bake that makes you want to curl up with a blanket and a hot cup of tea. I love this recipe because I’ve often made it for tea time with friends, and we’ve relished it together on many autumn afternoons with cups of coffee and tea. The leftovers if any were always polished off the next morning for breakfast with a generous spread of butter and strawberry compote. This recipe is also featured in the “Breads” section of my cookbook Cakes, Desserts & Beyond, where I’ve shared some of my favorite loaf and quick-bread recipes. Fall Baking: Spiced Pumpkin Bread Recipe Ingredients 1 ¾ cups all-purpose flour¾ teaspoon baking powder½ teaspoon baking soda1 teaspoon ground cinnamon¼ teaspoon ground nutmeg¼ teaspoon ground ginger¼ teaspoon ground cloves½ teaspoon salt1 cup pumpkin puree5 tablespoons (79 ml) vegetable oil1 cup granulated sugar2 eggs, room temperature2 teaspoons vanilla extract¼ cup buttermilk, room temperature  Streusel Topping ¼ cup brown sugar¼ cup all-purpose flour½ teaspoon cinnamon2 tablespoons butter, melted¼ cup pumpkin seeds Tools and Equipment 5-inch x 9-inch loaf tinParchment paperElectric beater Instructions Preheat oven to 340°F (170°C). Grease, flour and line a 5-inch x 9-inch loaf tin with parchment paper. Sift together the flour, baking powder, baking soda, cinnamon, ground nutmeg, ground ginger, ground cloves and salt. In the bowl of a stand mixer fitted with the balloon attachment, beat together the pumpkin puree, oil, sugar, eggs, vanilla and buttermilk. Add the dry ingredients to the wet mix and beat until just incorporated. Pour the batter into the prepared loaf tin. For the streusel, stir together the brown sugar, flour and cinnamon. Pour in the melted butter and mix until crumbly. Sprinkle the streusel on top of the batter and scatter with pumpkin seeds. Bake the bread in the center shelf of the preheated oven for an hour or until a cake tester inserted into the center of the loaf comes out clean. Once the bread is ready, take it out of the tin and turn out onto on a wire rack to cool completely. Tip : To get the best autumn flavor in the bread, use freshly ground spices. Spices that have been sitting on the counter for too long lose their freshness. Cookbook SpotlightThis recipe is just one of the many delicious breads featured in my cookbook Cakes, Desserts & Beyond. From everyday favorites to show stopping bakes, it’s filled with recipes designed to bring joy to your kitchen.Discover more from  https://a.co/d/08YioX3  Love baking as much as I do? Subscribe to my monthly newsletter for exclusive recipes, handy baking tips, behind-the-scenes peeks, and updates on upcoming workshops. Delivered to your inbox once a month!

Marble ring cake
Baking Tips

My First Baking Disaster (and What I Learned)

My First Baking Disaster (and What I Learned) It was one of those whirlwind days when I was trying to do ten things at once. Somewhere between answering messages, tidying up, and keeping an eye on dinner, I decided I could also whip up a chocolate cake. I measured the flour, cocoa, eggs, butter, and everything else I needed—or so I thought. Confidently, I mixed it all together, popped it in the oven, and carried on with my day. But when I opened the oven door to check if it was done, I was met with… well, something that looked like a cake but definitely wasn’t one. It was flat as a pancake, dense, and heavy. The texture was completely off. That’s when it hit me: I had forgotten to add sugar—the one ingredient that not only sweetens but also helps create structure and tenderness in the cake. The truth is, baking cannot be rushed. I usually gather all my ingredients on the counter before I start measuring, what we call “mise en place.” But that day, in my rush, I skipped this step and paid the price. Lesson learned: Slow down, prepare everything first, and never underestimate the importance of the basics. Every mistake in the kitchen is just another step toward becoming a better baker – and this flat, sugarless “cake” is one lesson I’ll never forget. Baking Tip : Always measure with “mise en place” in mind—gather all your ingredients on the counter before you start mixing. This small step prevents forgotten ingredients and saves you from mid-bake disasters. Plus, it makes baking feel calmer and more enjoyable.  Love baking as much as I do? Subscribe to my monthly newsletter for exclusive recipes, handy baking tips, behind-the-scenes peeks, and updates on upcoming workshops. Delivered to your inbox once a month!

Advanced Cake Baking Tips for Professional-Looking Layers
Baking Tips

Perfect Cakes Every Time: Pro Tips From My Kitchen

Perfect Cakes Every Time: Pro Tips From My Kitchen Whether you’re making a wedding cake or a simple birthday sponge, the difference between “nice” and “wow” comes down to technique. Here’s how to bake like a pro. Weigh Everything – A digital scale is your best friend. Consistency in ingredient ratios means consistent results, and it’s how professionals maintain perfection across multiple batches. Perfect Ingredient Temperatures – Follow your recipe’s temperature guidelines. Cold butter won’t cream properly, and cold eggs can cause batters to curdle. Room temperature means truly room temperature — plan ahead. Use Cake Flour for Soft, Tender Cakes – For sponge and vanilla cakes, cake flour is the key to achieving that delicate, melt-in-the-mouth texture. With a protein content of about 7–8% (compared to 10–12% in all-purpose flour), it develops less gluten, resulting in a finer crumb and softer bite. This makes your cakes light, airy, and irresistibly tender every time. Try the Reverse Creaming Method – Instead of creaming butter and sugar first, start by mixing flour with the butter. This coats the flour in fat, limiting gluten formation and producing a more tender crumb. Add Coffee to Elevate the Taste of Chocolate Cake – Add hot coffee to your chocolate cake batter to intensify its flavor. The heat helps bloom the cocoa, releasing deeper, richer notes, while the coffee’s natural bitterness enhances the chocolate’s complexity without making the cake taste like coffee. Syrup for Moisture and Flavor – Brush cake layers with a flavored syrup — think espresso for chocolate cake or lemon for vanilla sponge. This not only adds moisture but also creates subtle, sophisticated flavor layers. Crumb Coat for a Smooth Finish – Spread a thin “crumb coat” of frosting over the cake, chill until set, then apply your final smooth layer. This keeps crumbs out of your smooth finish.  Love baking as much as I do? Subscribe to my monthly newsletter for exclusive recipes, handy baking tips, behind-the-scenes peeks, and updates on upcoming workshops. Delivered to your inbox once a month!

Chocolate Chip Cookies
Baking Tips

Advanced Cookie Baking Secrets for Bakery-Style Results

Advanced Cookie Baking Secrets for Bakery-Style Results We all love a warm, gooey cookie fresh from the oven — but if you want yours to look and taste like they came from a boutique bakery, it’s time to step up your game. Here are the secrets pastry chefs use for unforgettable cookies. 1. Age Your Dough – Refrigerate cookie dough for 24–72 hours before baking. This allows the flour to fully hydrate and flavors to deepen, giving you richer, more complex cookies. 2. Combine Sugars for Texture – Use both white and brown sugar. White sugar gives crisp edges, while brown sugar adds chewiness and depth. Adjust the ratio depending on whether you like your cookies soft or crunchy. 3. Chill Before Baking – Even after portioning, chill the dough balls before baking. Cold dough spreads more slowly, resulting in thicker, more substantial cookies. 4. Pan Choice Makes a Difference – Use light-colored aluminum pans for even coloring. Dark pans absorb more heat and brown the bottoms faster — useful for extra-crisp cookies, but risky for delicate types. 5. Add the Finishing Touch – Sprinkle cookies with flaky sea salt the moment they come out of the oven. This little touch instantly makes them feel gourmet while balancing sweetness. Love baking as much as I do? Subscribe to my monthly newsletter for exclusive recipes, handy baking tips, behind-the-scenes peeks, and updates on upcoming workshops. Delivered to your inbox once a month!

Advanced Dessert-Making Tips for Home Bakers Who Want to Go Pro
Baking Tips

Advanced Dessert-Making Tips for Home Bakers Who Want to Go Pro

Advanced Dessert-Making Tips for Home Bakers Who Want to Go Pro If you’ve mastered the basics of making brownies and cupcakes, it’s time to level up and think like a pastry chef. High-end desserts aren’t just about following a recipe — they’re about balance, precision, and presentation. Here’s how to bring that restaurant-worthy magic into your own kitchen. Balance Texture and Flavor – A great dessert isn’t one-dimensional. Aim for contrasts: creamy with crunchy, sweet with tart, warm with cold. Think silky vanilla panna cotta topped with a crisp almond tuile, or a rich chocolate tart paired with a bright raspberry coulis. These contrasts keep every bite interesting. Infuse Flavors at the Source – Instead of adding flavor extracts at the end, infuse them into your base ingredients. Warm cream with fresh herbs, citrus zest, tea leaves, or spices before using it in a custard, ganache, or mousse. This creates a depth of flavor that feels natural and refined. Play with Temperatures – Temperature can be as important as taste. Serving a warm chocolate fondant alongside cold vanilla ice cream adds drama and heightens the experience. Rest and Develop – Many desserts improve after a rest. A mousse might be fluffier after overnight refrigeration, and certain tarts taste better the next day as the flavors mingle. Don’t rush, patience often rewards you with better texture and taste. Finish with a Professional TouchUse glazes, mirror finishes, cocoa sprays, or even a light dusting of powdered sugar through a stencil. The visual polish is what transforms a good dessert into a showstopper.  If you’re just starting your baking journey — welcome! Think of this as your little starter guide to help you avoid common slip-ups and set yourself up for success. Measure Like a Pro – Baking isn’t just cooking — it’s a delicious kind of science. A pinch too much flour or a splash too little milk can change everything. Use proper measuring cups and spoons, and for flour, spoon it into the cup and level it off. No scooping straight from the bag — trust me, your cakes will thank you. Preheat, Always – Your oven is like a stage, and your cake is the star — you don’t want them arriving before the lights are on! Make sure it’s fully preheated so your bakes rise evenly and develop that beautiful golden color. Room Temperature is Magic – Cold butter is stubborn, and cold eggs can shock your batter. Let your butter, eggs, and milk sit out for a bit before baking. They’ll blend together like old friends, giving you smoother batters and fluffier cakes. Read Before You Whisk – Before you dive in, read the whole recipe once (or twice). You’ll know exactly what’s coming next, and you won’t be caught off guard when you realize the dough needs to chill for an hour — just as your guests arrive. Love baking as much as I do? Subscribe to my monthly newsletter for exclusive recipes, handy baking tips, behind-the-scenes peeks, and updates on upcoming workshops. Delivered to your inbox once a month!

Chocolate Tart
Baking Tips

Essential Baking Tips for Beginners

Essential Baking Tips for Beginners If you’re just starting your baking journey — welcome! Think of this as your little starter guide to help you avoid common slip-ups and set yourself up for success. Measure Like a Pro – Baking isn’t just cooking — it’s a delicious kind of science. A pinch too much flour or a splash too little milk can change everything. Use proper measuring cups and spoons, and for flour, spoon it into the cup and level it off. No scooping straight from the bag — trust me, your cakes will thank you. Preheat, Always – Your oven is like a stage, and your cake is the star — you don’t want them arriving before the lights are on! Make sure it’s fully preheated so your bakes rise evenly and develop that beautiful golden color. Room Temperature is Magic – Cold butter is stubborn, and cold eggs can shock your batter. Let your butter, eggs, and milk sit out for a bit before baking. They’ll blend together like old friends, giving you smoother batters and fluffier cakes. Read Before You Whisk – Before you dive in, read the whole recipe once (or twice). You’ll know exactly what’s coming next, and you won’t be caught off guard when you realize the dough needs to chill for an hour — just as your guests arrive. Love baking as much as I do? Subscribe to my monthly newsletter for exclusive recipes, handy baking tips, behind-the-scenes peeks, and updates on upcoming workshops. Delivered to your inbox once a month!

mubinamaqbool
Uncategorized

Welcome to My Baking Blog!

Welcome to My Baking Blog! Hello, dear baking friends! I’m Mubina Maqbool, and I’m so excited to invite you into my world of whisking, folding, and sprinkling a little magic into every creation. From the moment I first cracked an egg and blended flour with sugar, I knew I had found something extraordinary. Baking, for me, is more than a pastime, it’s a canvas for creativity, a way to bring people together, and a recipe for treasured memories. My journey began in my cozy home kitchen, experimenting with treasured recipes and slowly crafting my own signature creations. Over time, each bake became more than just something sweet to eat — it became a story to tell. And here, I can’t wait to share those stories with you, along with plenty of irresistible recipes to try. On this blog, you’ll find: Tried & True Recipes – From timeless classics to playful new twists, complete with easy-to-follow instructions so you can bake with confidence. Tips & Tricks – Practical advice and techniques to help you master everything from the perfect sponge to the glossiest ganache. Sweet Stories – Personal moments from my baking adventures — the victories, the lessons, and the pure joy that each creation brings. So, preheat your oven, dust off your mixing bowls, and let’s embark on this delicious adventure together. Whether you’re here to learn, be inspired, or simply indulge in the beauty of baking, I’m so glad you’ve found your way here.Here’s to baking, bonding, and sharing every sweet moment along the way! Love baking as much as I do? Subscribe to my monthly newsletter for exclusive recipes, handy baking tips, behind-the-scenes peeks, and updates on upcoming workshops. Delivered to your inbox once a month! Happy baking,Mubina 

Contact

Scroll to Top